Collaboration with translators, testers and proofreaders
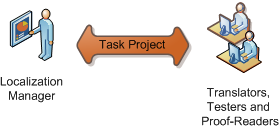 In this step-by-step tutorial we describe how localization manager interacts with translators, testers and proof-readers. In this step-by-step tutorial we describe how localization manager interacts with translators, testers and proof-readers.
There are two major opertions:
Sending a task
To send task to translators you need
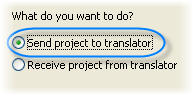
- Open Exchange Wizard from File menu.
- Choose Send project to translator.
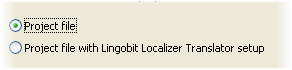
- Select Project File to send your project file or select Project File with Lingobit Localizer Translator Setup to send a project file along with the working environment.
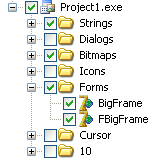
- Choose which languages and items to include in the project file. If you are running a large-scale localization project you can easily distribute the work among different translators choosing which languages/elements to export.
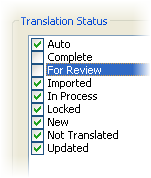
- In the next window using translation status you can choose what elements to include in the exchange package. Usually, it is rational to exclude Locked and Complete elements. When translating updated application you should check only New and Updated.
- If you have opted for sending project file with Lingobit Localizer Translator, on the next step you will be able to attach additional files and type comments for the translator. You can always use Translator's Manual from our website.

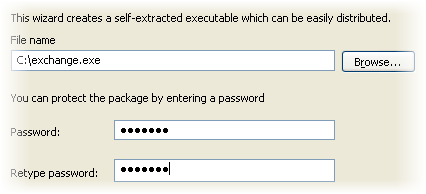
- Choose filename and location for your project file. You may also password protect it.
If you decide to send a task to Tester or Proofreader the procedure will be similar.
Receiving a completed task
To intergate completed task into the master project follow step below.
- Navigate to Exchange Wizard menu (File/Exchange Wizard).
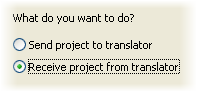
- Choose ?Receive project from translator?.
- Click browse to open the project file that you have received.
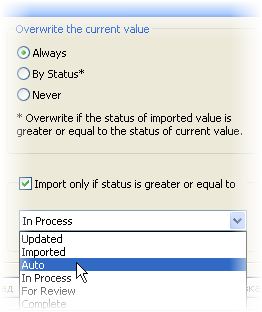 Choose how to handle received translations. You have 3 options here. First choice is to overwrite all your translations with those in the project file. The translation status for the replaced elements will be set as in the received project.The other option is to overwrite only those of your translations that have their status lower or equal to the status of corresponding translations in the project file you have received. Finally, you can keep all existing translations and update only Not Translated elements. Choose how to handle received translations. You have 3 options here. First choice is to overwrite all your translations with those in the project file. The translation status for the replaced elements will be set as in the received project.The other option is to overwrite only those of your translations that have their status lower or equal to the status of corresponding translations in the project file you have received. Finally, you can keep all existing translations and update only Not Translated elements.- Check Import only if status is greater or equal to box if you want to import translations from the received project depending on their status. Then select the appropriate status in the drop-down list.
|